Adding Image Overlays
You can add image overlays — such as company or institution logos, as well as graphs and images captured from Dragonfly — to 2D and 3D scene views to further describe or identify an image. Using image overlays in screen captures and video presentations can make scenes in the movie more easily understandable.
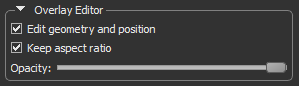
The options for adjusting image overlays are available in the Overlay Editor, shown below.
Image Overlay Editor
| Description | |
|---|---|
|
Edit geometry and position |
If checked, the image overlay box will be unlocked and can be moved and resized. |
|
Keep aspect ratio |
If checked, the aspect ratio will be maintained when the image overlay is resized. |
|
Opacity |
Determines the opacity of the selected image overlay.
|
It is very simple and effortless to add images in Dragonfly. Image overlays can be positioned anywhere inside a scene view and can be resized for the best fit. In addition, opacity is adjustable in the Overlay Editor. Image overlays initially appear in the currently selected scene view, but can also be shown anywhere else in the workspace.
- Select the scene view to which you want to add the image overlay.
- Click the Image Overlay
 button on the Overlays panel.
 - Choose the required image in the Import an Image from File dialog.
- Click the Open button.
The image appears in the selected view and is listed in the Data Properties and Settings panel (see Overlay Properties and Settings).
- Do the following to move the image:
- Make sure that the Edit geometry and position option is checked in the Overlay Editor box.
- Drag from the center of the Image Overlay box to reposition it, as shown below.

Note After your adjustments are complete, you can lock the Image Overlay box by unchecking the Edit geometry and position option.
- Do the following to resize the image:
- Make sure that the Edit geometry and position option is checked in the Overlay Editor box.
- Check the Keep aspect ratio option, if required. If checked, the aspect ratio of the original image will be maintained when the image overlay is resized.
- Drag a face of the Image Overlay box to resize it, as shown below.

Note After your adjustments are complete, you can lock the Image Overlay box by unchecking the Edit geometry and position option.
- Adjust the opacity of the image, as required.
- Save the overlay, if required (see Exporting Objects).
You should note that text overlays can also be saved in session files (see Working with Sessions).
- Select the image overlay you need to edit in the Data Properties and Settings panel.
- Resize or move the Image Overlay box, as required.
- Adjust the opacity of the image, as required.


